
by Paul Collart
3D Tour Solutions for Real Estate – A Technical Deep Dive
San Francisco (7 December 2016) – If you had placed a bet a year ago that I would be blogging about 3D tour solutions for real estate, odds would NOT have been in your favor.

Since selling my software company at the end 2016 – and trying to decide on my next career move – I started researching the latest technology trends in the AEC (Architecture, Engineering, Construction industry, which was my expertise “pre” business ownership. It may have been a wave of nostalgia or just a logical next step, but I decided I would reach out to friends and colleagues in the San Francisco Bay Area to offer my services on live projects and test (or play with) some of the new technologies.

This enabled me to get familiar with some of the latest up-and-coming technologies, including:
- Virtual Reality (VR)
- Augmented Reality (AR)
- Virtual Design and Construction (VDC)
- Three Dimensional (3D) Tours for Real Estate
My biggest surprise was to see that day-to-day operations have not changed drastically since the good old days. A fact that has given me some hope that I can help them integrate new technologies into their daily workflow.

One of most common pain points for architects with any new project is having to travel on-site, manually document measurements, take still photos for reference, and then verify/modify existing Computer-Aided Design and Drafting (CADD) drawings or re-create them from scratch.
While assisting on large commercial projects (i.e. spaces 200,000 sf and larger), I naturally gravitated to using expensive, high-end LiDAR based solutions (i.e. Faro, Leica, IndoorReality, etc.). One deliverable from these solution providers is a very detailed and accurate point cloud, which can be over-layed in Autodesk AutoCAD or Autodesk Revit and used as a template to re-create a parametric based CADD model. I quickly discovered that most CADD-capable architects are not familiar with this process, that limits this work to either specialized consultants or internal CADD experts.

Another deliverable from some of these high-end solutions is a 3D tour, which quickly became useful to all parties involved with the project, not just the CADD experts. The 3D tour enabled project members to visit the site from their desk or mobile device at any time, limiting the time and money-consuming task of visiting the site. But since these high-end solutions can range in price from $1.00/sf for smaller projects to $0.10/sf for very large projects, I shifted my research to off-the-shelf 360-degree panoramic cameras.
The folks from Panono were kind enough to lend me their panoramic camera for a specific project in which I was assisting an architect in reconstructing the exteriors of the PayPal corporate campus in San Jose. Our CADD expert leveraged a point cloud, which was generated via Autodesk Remake from Google Earth screen grabs, in combination with panoramic images, to efficiently re-create the 7 building shells in Autodesk Revit. It quickly became evident that panoramic imagery is a simple and cheap solution that AEC professionals could use on every project. But as you can see from these images from the PayPal project, there was still a need to organize these images and provide a context via a floor plan and/or hotspots so time is not wasted finding the necessary imagery.

This last requirement ultimately led me to the research of 3D tour solutions for real estate. As I started to conduct my research on a dozen solutions, it became evident that I needed to test drive each solution, which enabled me to discover first-hand specific capabilities, as opposed to relying on marketing materials and user forums. And ultimately being encouraged to write and publish a review on my findings on the We Get Around blog.
Review Overview
Since I am new to technologies for the residential real estate industry and more specifically high-end photography and 3D tours, I not only researched the different solutions, but also researched the total available market for these technologies in the United States.
I was surprised to find that only 35% of the homes for sale leverage professionally captured photography and only 5-10% of those homes use 3D tours. I’m not sure if this is an issue of cost, demand, or other factors, but it appears there is still a huge amount of market share to capture with some of these technology solutions.
However, the goal of this article is to provide the technical details associated to capturing, creating, and publishing 3D tours for real estate and empower the reader to compare the 3D tour results from multiple solutions on the same residential property.
Ultimately, each reader can come to their own conclusions about the best solution for their needs based upon:
- hardware costs
- image quality
- walk-through experience
- tour and subscription costs
- level of effort
- ease of use
- and more
Please note that this article assumes that the reader has past experiences viewing, contracting, and/or creating 3D tours and will not discuss the history and impact of technology and 3D tours in this industry.
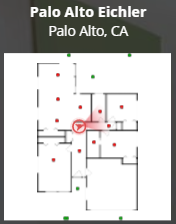
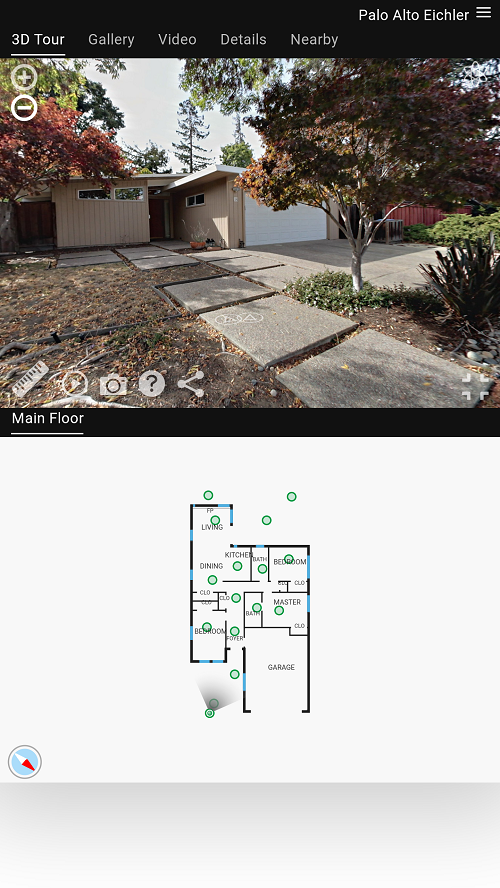
Most of the content for this review will focus on the following 3D tour solutions, which also includes a link to the sample 3D tour of the same house in Palo Alto, CA.
Chart 1 – Sample Tour (Palo Alto Eichler) | Source: Paul Collart
- Matterport
- InsideMaps
- Realvision (formerly Toursler)
- iGuide (formerly Planitar)
- immoviewer
The following 3D tours will also be discussed, but will contain limited content in the review.
Chart 2 – Sample Tour (Palo Alto Eichler) | Source: Paul Collart
General Disclaimers
Compare 3D/VR Platforms for Scanning/Shooting Homes: #Matterport, #InsideMaps, #Realvision, #iGuide and #immoviewer https://t.co/cZlaQoBjcH
— We Get Around (@We_Get_Around) December 9, 2016
Each solution review includes a Level of Effort (LOE) summary to create each sample 3D tour. Please note this time does not take into consideration other factors in creating a 3D tour, including the following …
- Travel to and from the property site
- Preparation and setup time of the property, which would include opening drapes, turning on lights, prop open doors, de-cluttering, cleanup, etc.
- Time waiting for uploading and/or cloud processing.
The panoramic imagery will vary between solutions, since they were done over a month and a half and at different times of the day with different conditions. And lastly, the order of the primary solutions is based on the order in which the tours were created.
Feature Summary
Chart 3 – Feature Summary | Source: Paul Collart
Editor's Note: Join in the Discussion of this chart in the We Get Around Network Forum Post: Chart: Comparing Five 3D/VR Platforms


Matterport
Matterport got their start in residential real estate by marketing their solution to the professional photography community, whom typically offer the Matterport Spaces 3D tours as an additional service accompanied with high-resolution photography and traditional property listing solutions.

Recently, Matterport has been extending their marketing reach worldwide and expanding to additional verticals, including:
- commercial real estate
- AEC (Architecture, Engineering, Construction (AEC)
- entertainment/media
Their proprietary Matterport Pro 3D Camera captures not only panoramic images, but also performs 3D scanning via structured-light (or infrared) technology to capture the space within a 3D point cloud. The Matterport Cloud, Workshop, and Showcase make up their on-line infrastructure for processing, managing, and hosting 3D tour.
Other key Matterport features include the following:

Matterport Photo 3D Camera
Add MatterTag Posts or information tags within the Matterport Space (3D tour) to highlight specific features and provide detailed descriptions and links.
Create a Highlight Reel to provide visitors suggestions on key views.
Curated option lets visitors sit back and enjoy pre-defined slideshow or walkthrough.
Request a schematic 2D floor plan for an additional $15. (Note that many operators opt for third-party service providers that provide enhanced plans faster and with more options)
Add “Collaborators” to the property, which grants limited administrative rights and the ability to collect dimensions and create SnapShots (or screen grabs) from the 3D tour.
- Download a textured, 3D mesh model (OBJ) or colorized point-cloud (PTS) for use in CADD software programs. Currently, there is no cost to download these files, but this could change in the future.
- Review analytics based on number of impressions (opening a 3D tour), visits and unique visitors.
- Matterport 3D Showcase (iOS) app for viewing models off-line
The Matterport sample 3D tour for the Palo Alto Eichler property can be found here.
Creating the Matterport Spaces 3D Tour
Since the Matterport hardware costs were beyond my budget, I coordinated the capture of this property with a Matterport Service Provider (MSP) in my area. This MSP performed the data capture and post-processing described below. I was added as a collaborator on the space to adjust the final result.
Matterport Data Capture (3D Tour)

iPad Screen Grab: 1 Matterport Scan
The initial steps involve mounting the Matterport Pro 3D Camera to a tripod, connecting the iPad to the camera’s Wi-Fi connection, launching the Matterport Capture iPad app, and starting a new model. To capture a “regular” single scan, the camera automatically rotates to 6 positions while it collects panorama imagery and 3D scan data. Once the space is finished, the iPad application presents the operator with a top-down view of the 3D scan data in a point-cloud, which continues to grow as more scenes are captured. This 3D preview allows the operator to visually verify model completeness. Please note that the iPad application does not provide a preview of the panoramic imagery. Please watch this video of the Matterport Camera in action.
Since the Matterport Pro 3D Camera is leveraging structured-light (or infrared) scanning technology, which has limited range, it is required that scan locations not only have a line-of-sight to another scan, but scans are spaced about 5-8 feet apart.
A “regular” scan is possible in outdoor conditions as long as the camera does not "see" the sun. In conditions where the camera is in line with the sun, Matterport offers a “360 Photo” scan option, which only captures the panoramic imagery: not the data. Since these scans do not use 3D scanning functionality, these scans are not positioned within the point cloud (or 3D mesh model) and are not included as hotspots in the 3D tour. These 360 Photo scans can only be found in the Highlight Reel, which is described below.
Matterport recommends that the MSP mark or identify windows, mirrors (and trim) within the top-down preview, which enhances the Matterport Space 3D tour. This can be done after each scan capture or done after all scans have been captured on the iPad. This process must be completed before uploading for processing in the cloud.
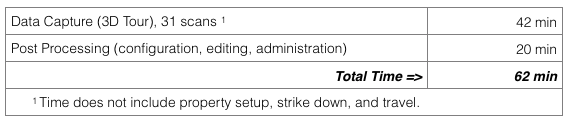
The total MSP time to capture the sample Palo Alto Eichler project was about 42 minutes, which included 25 indoor and 6 outdoor scans for a total of 31 scans. This equates to about 1 minute 30 seconds to position the tripod and camera to a new location, perform a scan (about 45 seconds), transfer data to the iPad, review the results, and mark windows and mirrors.
Upon completion of the 3D tour, the MSP must reconnect the iPad to the Internet and initiate the upload to the Matterport Cloud for processing. The sample Palo Alto Eichler project took about 0.5 GB of storage space, which takes about 45 minutes to upload to the Matterport Cloud with a 2 Mbps upload speed.
Matterport Post-Processing
The processing of the 3D tour after upload, which includes the automatic stitching of the panoramic images, can take anywhere from 2 to 10 hours. This time depends upon both the size of the model and the processing queue demand on the Matterport Cloud.
After receiving an email notification upon processing completion, the MSP can log in to the Matterport Cloud and start configuring the basics, including:
- service provider details
- adding collaborators
- property address
- limited MLS details
- public or private settings
- property description
Additional changes can be made by loading the 3D model into the Matterport Workshop to change the way the 3D tour is presented, including the following:
- Update Start Position to a specific scan
- Hide scans within the 3D tour
- Add labels to specific spaces (or room names)
- Create MatterTag labels and anchor them to the underlying 3D mesh model
- Create and name SnapShots (screen image grabs) that can be used for display (or MLS), but are not high-resolution (for only use only)
- Create Highlight Reel from saved Snapshots to highlight specific scans within the 3D tour
Matterport Level of Effort (LOE) Summary
Please note the times below are estimates, since I did not perform these tasks.
Chart 4 | Matterport Level of Effort (LOE) Summary | Source: Paul Collart
Matteport 3D Tour Experience
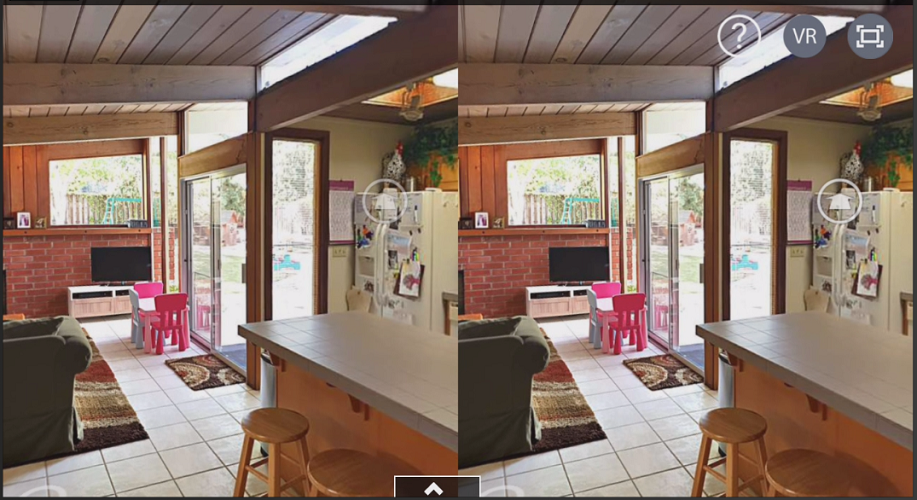
The Matterport Spaces 3D tour is comprised of 360°x170° panoramic images incorporated within a textured, 3D mesh model. Smooth and life-like navigation is achieved by dynamically switching to the 3D model while walking between the panoramic images. This enables the visitor understand their context within the space during navigation.
Matterport provides Dollhouse and Floor Plan views that enables the user to dynamically rotate and zoom within the 3D model from an overhead perspective. While other solutions provide a contextual view of both the panorama and its location on a 2D schematic floor plan, Matterport requires the visitor to toggle between these different views.
Matterport enables dynamic navigation within a 3D tour via multiple methods, including the following:
- Hotspots. White rings on the floor represent the actual camera placement during the scanning process. Visitors can select click on a ring and transition to that space.
- Keyboard and Arrow Keys. The Up and Down keys can be used to move forward and backward, much like video games. The Left and Right keys can be used for panning left and right in the current scene.
- Dollhouse and Floor Plan views allow for clicking in any space and transporting to the closest space.
- Enabling the Highlight Reel along the bottom enables the visitor to select and page through highlighted locations. This is also the only location to access outdoor spaces.

Screen Grab: Matterport Highlight Reel

Screen Grab: Matterport Spaces 3D Tour Viewed on a Smartphone (Portrait)
And lastly, Matterport is the only reviewed solution that supports occlusions.
This mean that the visitor can not 'walk through' walls. This provides true-to-life navigation through properties.
Mobile Browser Experience
The Matterport experience on a phone or tablet is very similar to a desktop browser minus the ability to change to full screen mode.
As with all solutions, the ideal viewing experience is in landscape mode to maximize the panoramic image.
Please see the following Matterport screen grabs from a Galaxy S7 phone.

Screen Grab: Matterport Spaces 3D Tour Viewed on a Smartphone (Horizontal)
Virtual Reality Experience
Matterport offers CoreVR, which turns existing Matterport 3D tours into immersive virtual reality experiences.

Matterport VR Icon
After January 1, 2017, Matterport Spaces 3D tours can be converted to CoreVR for an additional $19 charge. Currently, Matterport supports Android devices with Google Cardboard and Samsung Gear VR (Oculus powered).
The visitor can load the 3D tour and select the VR icon in the bottom right-hand corner of the Matterport Space.

The visitor is presented with a dialog to View Space in Virtual Reality with either Google Cardboard or Samsung Gear VR. Both options require the installation of an Android application, which can be accessed in the dialog by selecting the Learn More option. Matterport has announced that an iOS version will be released in the the first quarter of 2017. A third-party solution provider, MP2VR, also enables Matterport VR on Google Cardboard and Gear VR (via its Android apps) and has also announced plans to release an iOS version in the first quarter of 2017.
After selecting the VR display option, the visitor is presented with details on the current property. This property needs to be downloaded and then loaded to the Matterport mobile application. As opposed to displaying rings on the floor for navigation, they are replaced with hovering blue dots over the camera locations. This makes for an easier VR experience and doesn’t the require the visitor to look down to the floor for navigation. Focusing on the blue dot will transport you to that location. Since the Highlight Reel is not available, outdoor scans are not available in VR mode.

Matterport VR Side-bv-Side View
The visitor can focus on the floor and an option will appear to exit to the main menu. All downloaded 3D tours will be displayed in this menu. Once 3D tours are downloaded to the mobile device, they can be accessed directly from the Matterport mobile application.

Matterport VR Main Menu (Showing one VR: other spaces are blank)
Matterport Estimated Hardware Costs
Chart 5 | Matterport Estimated Hardware Costs | Source: Paul Collart
Editor's Note: Join in the discussion of this chart in the We Get Around Network Forum Post: Comparing Hardware Costs of 5 3D/VR Platforms

Please note that Matterport charges an additional $15 for the generation of a schematic floor plan.
Matterport Variable 3D Tour Costs
Matterport charges a monthly or yearly subscription fee for access to the Matterport Cloud (required). The processing fee per space (or project) is always $19 per space for up to 100 scans per space. Summary of plans are listed below:
Chart 6 | Matterport 3D Tour Cost for Palo Alto Eichler | Source: Paul Collart
Editor's Note: Join in the discussion of this chart in the We Get Around Network Forum Post: Comparing Hosting and Processing of 5 3D Camera Systems.

Matterport hosts 3D tours as long a long as an MSP has a Matterport Cloud subscription.
Chart 7 | Matterport Cloud Hosting Subscription Options | Source: Paul Collart

Matterport Company Background
Chart 8 | Matterport Company Background | Source: Paul Collart

InsideMaps
InsideMaps markets as a low-cost, high-quality, easy-to-use solution that can be used by both professional photographers, real estate agents and DIY enthusiasts.

InsideMaps leverages an iPhone 6, 6x or 7 in combination with a proprietary InsideMaps Hero rotor device that automates the precision rotation and image collection for the 360° panoramas.
The InsideMaps Cloud is their infrastructure for administration and property web-site hosting.
The base offering is comprised of a 3D tour, photo gallery and downloadable schematic floor plan with room labels and sizes.
A 3D, CADD-ready model is also available for an additional cost and is included in the Palo Alto Eichler sample property. With features to add furniture and change colors and materials to the model, you start to get the sense of the direction that InsideMaps is headed, which appears to be extending their services to DIY staging and remodeling as you can see in this video.

InsideMaps Rotator + iPhone
InsideMaps provides tools for the operator to extract display (MLS) and print (high-res) ready images from scans within the 3D tour and include them within the Photo Gallery. For $19.95 per home, InsideMaps can be used just for photography as InsideMaps automatically applies algorithms for vertical correction, sharpness, and color balance. You can see some sample images here.
The InsideMaps sample 3D tour for the Palo Alto Eichler property can be found here.
Below are some more sample tours I created with InsideMaps:
InsideMaps Creating the 3D Tour
Since I already had an iPhone 6, I purchased their InsideMaps Rotor and performed the capture and administration on my own.
InsideMaps Data Capture (3D Tour)
After mounting the InsideMaps Hero to the tripod, launching the InsideMaps iPhone application and creating a new project, the operator will go through the following steps to capture a property.
Chart 9 | InsideMaps Data Capture (3D Tour) | Source: Paul Collart

The creation of a panorama is fully automated with the InsideMaps Hero. For every horizontal rotation location, which is every 11.25 degrees or 16 unique rotations, the InsideMaps will vertically tilt the iPhone camera to 3 tilt locations and capture 3 exposures per location. Each scene or panorama is comprised of 192 individual images, which are automatically stitched into panoramas once processed in the cloud. Please see this video of the InsideMaps Hero in action.
The total operator time to capture the sample Palo Alto Eichler project was about 25 minutes, which included 12 indoor and 6 outdoor scans for a total of 18 panoramas. This equates to about 1 minute 20 seconds to position the tripod and camera to a new location and perform a scan (65 seconds).
If the iPhone is connected to Wi-Fi during the scanning process, it will automatically start to upload the data to the InsideMaps cloud. But if the iPhone is off-line, it will cache the data until a Wi-Fi connection is created. After successful upload to the InsideMaps cloud, the associated data on the iPhone will be cleared. The sample Palo Alto Eichler project took about 3 GB of storage space, which takes about 3 hours and 45 minutes to upload to the InsideMaps cloud with a 2 Mbps upload speed.
Please note that the InsideMaps application does not provide any feedback or viewable results during the scan process, which could lead to angst with some operators. I have personally done five different sample properties with InsideMaps and have not yet seen an issue with the 3D tour results.
InsideMaps Post-Processing
After the data is uploaded to the cloud, InsideMaps 3D tour and schematic floor plan will be processed within 12 to 24 hours. Note that my test projects averaged about 12 hours for processing. The only administrative tasks an operator can perform are the following:
- Floor Plan Labels. Tools are available to add or change automatically generated labels.
- Photo Gallery. Operator can capture screen shots from the 3D tour and display within the Photo Gallery. Please note that images from other sources are not available to be displayed.
- Modify Project Details, including address and real estate agent details.
Lastly, the operator must Make Project Public or pay for the project processing, which is facilitated via PayPal. This payment takes place after the processing, which enables the operator to review and confirm before payment.
InsideMaps Level of Effort (LOE) Summary
Chart 10 | InsideMaps Level of Effort (LOE) Summary | Source: Paul Collart

InsideMaps 3D Tour Experience
The InsideMaps 3D tour interface is comprised of a 360°x120° scans (or panoramas) with an interactive floor plan. The floor plan displays a locator icon for the scan, which helps the visitor with a sense of context and space while navigating through the property. InsideMaps enables dynamic navigation within a 3D tour via multiple methods, including the following:
InsideMaps Floor Plan
- Floating Arrows and Hotspots. Clicking on a floating arrow within a scan will transport the visitor to that location. Click on the rings or hotspots on the floor to move to that exact location. Note that hovering over the arrow or ring will also highlight the associated hotspot on the floor plan.
- Floor Plan and Hotspots. Click on any red dot in the floor plan to jump to that scan or location.
- Keyboard and Arrow Keys. The Up and Down keys can be used to move forward and backward, much like video games. The Left and Right keys can be used for panning left and right in the current scan.
- Highlight Reel. Click on any thumbnail to navigate directly to a feature scan. Note that this gallery is minimized by default.

InsideMaps Highlight Reel
A nice feature is the ability to completely minimize or hide the reference floor plan, which enables the scan (or panorama) to maximize the screen.

Screen Grab: InsideMaps 3D Tour Viewed on a Smartphone (Portrait)
InsideMaps Mobile Browser Experience
The InsideMaps experience on a phone or tablet is very similar to a desktop browser.
Please see the following screen grabs from a Galaxy S7 phone.
Please note that in the landscape version below, the full screen option in the upper-right corner was selected along with minimizing the floor plan.
[Insert InsideMaps Mobile portrait and landscape]
InsideMaps Virtual Reality Experience
Every InsideMaps 3D tour comes VR ready with support for Google Cardboard.
You need to simply load the 3D tour into the browser of your mobile device, select the full-screen option and then select the VR option, which are both found in the upper-right corner of the panorama and shown below.

Screen Grab: InsideMaps 3D Tour Viewed on a Smartphone (Landscape)
Since InsideMaps leverage the browser, there is no requirement to install an application on the mobile device to experience VR.

InsideMaps VR Icon
The primary method for navigation is with the Floating Arrows. Due to the vertical field of view limitation, I found it difficult to use the hotspots on the floor.
InsideMaps VR Side-by-Side View
InsideMaps Estimated Hardware Costs
Chart 11 | InsideMaps Estimated Hardware Costs | Source: Paul Collart
Editor's Note: Join in the discussion of this chart in the We Get Around Network Forum Post: Comparing Hardware Costs of 5 3D/VR Platforms

InsideMaps 3D Tour Cost for Palo Alto Eichler
Chart 12 | InsideMaps 3D Tour Cost for Palo Alto Eichler | Source: Paul Collart
Editor's Note: Join in the discussion of this chart in the We Get Around Network Forum Post: Comparing Hosting and Processing of 5 3D Camera Systems.

Please note that InsideMaps includes the generation of a schematic floor plan in the cost of model processing.
InsideMaps Variable 3D Tour Costs
InsideMaps does not charge minimum subscription fees for use of the system. The cost to process and host an InsideMaps 3D tour is based on the project size and described below. Summary of packages are listed below:
Chart 13 | InsideMaps Variable 3D Tour Costs | Source: Paul Collart

Below provides some example projects and associated costs:
Chart 14 | InsideMaps Example Projects and Associated Costs | Source: Paul Collart

InsideMaps Company Background
Chart 15 | InsideMaps Company Background | Source: Paul Collart

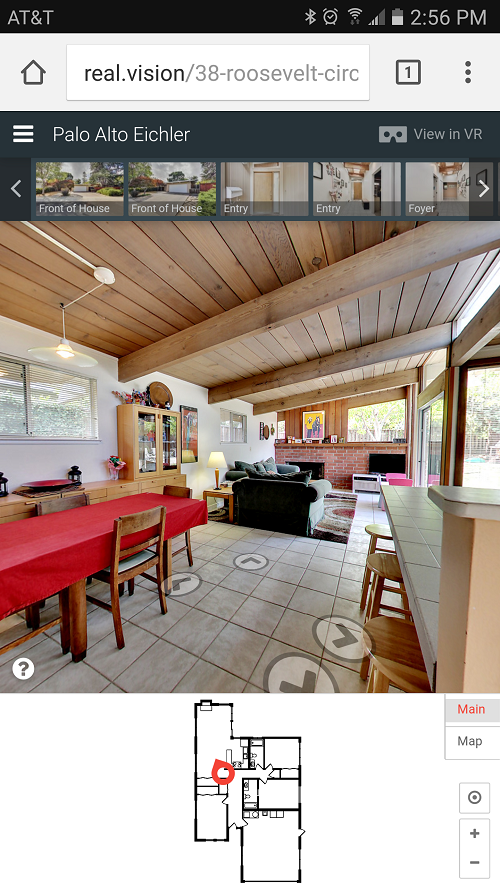
Realvision (formerly known as Toursler)
Realvision, formerly Toursler, markets as a high-end solution to professional photographers to serve real estate agents. The capture process requires some training and skill, but most photographers will find the learning curve to be very short. The solution leverages off-the-shelf, professional photography equipment, which is comprised of a DSLR camera body, fisheye lens and a tripod head system for precise rotation of the camera. Please note specific models are required for each component, which can be found on their web site.

The Realvision Platform is their cloud hosted infrastructure for administration and property web-site hosting. The base offering includes an Interactive Tour (3D tour), Photo Gallery and Floor Plan. The 3D tour is comprised of 360°x180° degree panoramic images referenced on a schematic floor plan, while the Photo Gallery provides a simple interface to browse through select property images.
Other key Realvision features include the following:
Ability to extract print and display ready images directly for the 3D tour
- Photo gallery capable of displaying images from 3D tour or from any source
- Branded schematic floor plan following ANSI Z765 standards, which includes room labels, dimensions and floor area for each floor
- Ability to password protect tours and take them off line at any time
- Integration with Google Analytics for tracking statistics
- Grant access to additional users to edit tours, upload images to gallery, and create still images
The Realvision Palo Alto Eichler sample 3D tour can be found here.
Realvision Creating the 3D Tour
Since I did not have the minimum hardware requirements and the costs were beyond my budget to perform this review on my own, Realvision coordinated the capture of this property with a service provider in my area. This operator also performed the data pre-processing and initial administration described below.
Realvision Equipment Setup
I did not include equipment setup for the other solutions, but wanted to mention the importance of calibrating the Realvision tripod and lens height to enable accurate 3D model and schematic floor plan creation. Realvision does not require manual, on-site measuring. This calibration process only take a few minutes.
Realvision Data Capture (3D Tour)
To capture a single HDR scene or scan, the camera is manually rotated to four pre-configured positions every 90-degrees, where the operator captures 3 exposures at every position for a total of 12 images. To flag the completion of a single scan, the operator places their hand in front of the lens and takes another 3 exposures for a total of 15 images per scene. This last shot or end-of-scene marker acts as a visual indicator required for file sorting and uploading. The operator can inspect the image results during this process and make necessary camera adjustments.
Realvision documents specific scene capture requirements to ensure the best navigation experience and appropriate processing of the 3D tour and schematic floor plans. Some of those requirements are listed below.
- Each scan location must have a clear line-of-sight to another scene
- Connected scans should be spaced at a maximum of 16 feet or 5 meters
- Significant features (i.e. walls, stairs, porches, patios, balconies, terraces, basement walkouts, etc.) should have a scan within 3 feet or 1 meter to be included in the floor plan
- At least one scan in each room should provide a good view to extract well-composed still photos
- Scans not intended to be shown in the 3D tour (i.e. cluttered rooms, messy garages, storage areas, house exteriors, etc.) should be create to create a full 3D model of the property and a complete schematic floor plan
After finalizing HDR scene (or scan) capture, reference photos with a single exposure are required for any small hidden areas (i.e. laundry stations, water heaters, furnaces, closets, etc.) not visible in the 3D tour. These photos are used as visual reference during schematic floor plan creation.
For the example Palo Alto Eichler property, the following images were created:
- 51 total HDR scenes (or scans), which is comprised of 22 outdoor and 29 indoor scans
- 14 reference photos of closets
The total operator time to capture the Palo Alto Eichler was about 80 minutes, in which the scan took 70 minutes and the reference photos took 10 minutes. Each scene (or scan) takes about 1 minute 20 seconds to move the tripod & camera to a new location and perform scan (60 seconds).
Realvision Pre-Processing (Verify Data)
Realvision requires a desktop computer to review and sort data prior to upload into the Realvision system.
After copying the files from the camera’s SD card to a desktop computer, the operator must verify the order and numbering of the scene images and verify each unique scene contains the required 15 images.
The operator must also separate out the reference photos. This process for the Palo Alto Eichler project took about 10 minutes.
Note that this is the opportunity for an operator to modify the images with photo editing software to remove reflections or blur content to each of the (3) exposure images.
The sample Palo Alto Eichler project took about 1.5 GB of storage space, which takes nearly two hours to upload to the Realvision cloud with a 2 Mbps upload speed.
Realvision Post-Processing (Create Tour, Upload Data, Create Image Gallery)
The operator logs into the Realvision system, creates (or books) a new tour, configures basic information (i.e. address, tour URL, description, real estate agent info, etc.) and uploads the reviewed data within the Pre-Processing step. The system automatically stitches the data into full panoramic images, which typically takes several hours to complete after upload. Once the scans are processed, the system enables options to adjust the brightness, contrast, temperature, tint, and saturation for each panoramic.
Navigating to the Gallery tab, the operator can dynamically extract images from the 3D tour, specify specific aspects ratios and provide captions for each image. Images from other sources can also be imported and included in the image gallery. Navigating this example, Realvision has options to download the images in multiple formats, including MLS, screen and full sized images. Below is a screen shot of the Gallery editor.

Realvision Gallery Editor
Please see the Realvision workflow summary below.

Realvision Workflow Summary | Source: Realvision
Please see this video of the entire creation process of a 3D tour.
Realvision Level of Effort (LOE) Summary
Please note the times below are estimates, since I did not perform these tasks.
Chart 16 | Realvision Level of Effort (LOE) Summary | Source: Paul Collart

Realvision 3D Tour Experience
The Realvision 3D tour interface is comprised of a 360°x180° panoramic image with an interactive floor plan. The floor plan displays a locator icon for the current panorama, which helps the visitor with a sense of contact and space while navigating through the property. Realvision enables dynamic navigation within a 3D tour via multiple methods, including the following:
- Hotspots and Screen Arrows in Panoramic Image. The Hotspots represent the location of a specific scan or panorama was taken, while the Screen Arrows give directional suggestions for user navigation.

Realvision Hotspot Arrows

Realvision Floor Plan
- Floor Plan & Hotspots. Even though the hotspots are not visible within the floor plan, you can click anywhere on the reference floor plan and it will navigate to the nearest scan or panorama.
- Keyboard and Arrow Keys. The Up and Down keys can be used to move forward and backward, much like video games. The Left and Right keys can be used for panning left and right in the current scan.
- Mouse Roller. The roller on the mouse can be used for dynamic navigation forward and backward.
- Highlight Reel. Page through highlights and transport to any featured scan or panorama.
Realvision Mobile Browser Experience.
The Realvision experience on a phone or tablet is very similar to a desktop browser with a few minor differences. As with all solutions, the ideal viewing experience is in landscape mode to maximize the panoramic image.
Hotspots are not enabled within the scans or panoramas
No ability to maximize the browser on screen

Realvision Highlight Reel
Realvision Viewed on a Smartphone (Portrait)
Please see the following screen grabs from a Galaxy S7 phone.

Realvision Viewed on a Smartphone (Landscape)
Realvision Virtual Reality Experience
Even though the VR features are currently in beta [as of December 2016], each Realvision property can test these features within Google Cardboard.

Realvision VR Viewer Icon
You must first install TourslerVR for Cardboard app on your Android device. Please note that you must load the property into your mobile browser first and select the View in VR icon in the upper right corner shown below.
You can then select to load the experience with the installed TourslerVR app. Note that you can only load the default sample properties if you launch the TourslerVR app directly.

Realvision VR Side-by-Side View
As expected in a VR experience, not all features found in the desktop browser version are available. The only navigation method available is via Screen Arrows. The full release of their VR solution is expected at the beginning of 2017.
Realvision Estimated Hardware Costs
Chart 17 | Realvision Estimated Hardware Costs | Source: Paul Collart
Editor's Note: Join in the discussion of this chart in the We Get Around Network Forum Post: Comparing Hardware Costs of 5 3D/VR Platforms

3D Tour Cost for Palo Alto Eichler
Chart 18 | 3D Tour Cost for Palo Alto Eichler | Source: Paul Collart
Editor's Note: Join in the discussion of this chart in the We Get Around Network Forum Post: Comparing Hosting and Processing of 5 3D Camera Systems.

Please note that Realvision includes the generation of a schematic floor plan in the cost of model processing.
Realvision Variable 3D Tour Costs
Realvision charges a monthly subscription fee for access to the system. The fees for the Business and Enterprise plans are creditable for model processing if the account remains active. Summary of plans are listed below:
Chart 19 | Realvision Variable 3D Tour Costs | Source: Paul Collart

Below provides some example projects and associated costs:
Chart 20 | Realvision Example Projects and Associated Costs | Source: Paul Collart

There are no limitations or time limits for hosting a property.
Realvision Company Background
Chart 21 | Realvision Example Projects and Associated Costs | Source: Paul Collart
iGuide (formerly known as Planitar)

Their solution is based on their iGuide Camera System, which includes a DSLR camera, fisheye lens and LiDAR scanner. The DSLR camera in combination with the fisheye lens captures high-resolution panoramic images, while the LiDAR scanner captures room dimensions to an advertised accuracy of 1 percent and auto-positions the panoramic images within
The iGuide Pal is their hosted cloud infrastructure for administration and property web-site hosting. The base iGuide offering is a 3D tour, which is comprised of 360x180 degree panoramas referenced on a schematic floor plan. Viewers can make onscreen measurements, enable an auto-play mode, and take still images from any position within the panoramic images.

Each 3D tour includes a downloadable schematic floor plan. The “Standard” package includes a basic schematic floor plan, while the “Premium” package includes more details including doors, appliances, and fixtures.
iGuide’s unique solution value is that it not only features 3D tours, but also provides the tools to present all details of a property, including image galleries and external videos. This enables the iGuide operator to offer additional solutions, including walk-throughs with voice-over, drone footage, and high-resolution photography.
Other key iGuide features include the following:
- Create photo gallery from 3D tour screen grabs that are both print-ready (high-resolution) and display (MLS) ready. Images from other sources can also be imported to the gallery
- Create feature sheets with the iGuide easy-to-use web interface to customize a printable marketing flyers
- iGuide Report that provides a summary of the listing with links to download all associated data.
- Download a schematic floor plan in PDF, SVG and DXF format.
- Completely open system so that the 3D tour assets can be exported and hosted on any web site. This includes access to the rectilinear 360 images for posting to Facebook and Google Maps
- Grant additional Editors to assist with making changes to the listing
- Receive weekly iGuide Analytics on visitor activity details, including number of unique and returning visitors, visit duration, and referring web sites
- Curated tour gives visitors and sit back and relax experience
The sample Palo Alto Eichler 3D tour can be found here.
iGuide Creating the 3D Tour
Since the hardware costs were beyond my budget to perform this review, Planitar coordinated the capture of this property with a service provider in my area. This operator also performed the data the pre-processing and initial administration described below.
iGuide Data Capture (3D Tour)
The first task for the iGuide operator is to connect any modern smart phone or tablet to the Planitar Camera System’s embedded web server via a mobile browser and create a new house or project. Since this is all browser based, there is no need to install an Android or iOS application to perform the capture.
After placing the camera system in the appropriate location, the operator has options to change camera settings via the web interface, but exposure must be adjusted from the camera body. The camera is rotated by the operator to 3 per-configured positions or every 120 degrees, where it captures 3 exposures at every position for a total of 9 images for each HDR scan or panorama. At the same time, the LiDAR scanner is measuring room dimensions. The browser interface will simultaneously display a preview panoramic image for each set of 3 images camera and the dimensional scanned data.
For the example Palo Alto Eichler project, 6 outdoor and 10 indoor scans were create for a total of 16. The total operator time to capture the 3D tour was about 22 minutes, which equates to about 1 minute 25 seconds to position the tripod and camera at a new location, perform the scan (45 seconds), and review the results. Since the LiDAR scanner can report out to 90 feet with 30 being the norm, the iGuide system requires fewer scans or locations as other systems. This video illustrates the speed at which a space can be captured.
iGuide Data Capture (High-Resolution Stills)
The iGuide operator took (23) high-resolution images for the Palo Alto Eichler property with a secondary DSLR camera for brochures and the image gallery, which took a total of 10 minutes. Please note this is an additional service the iGuide operator performed for this project.
iGuide Pre-Processing (Verify Data)
The iGuide operator is required to do some initial pre-processing of the data with iGuide's proprietary Stitch software, which is compatible on with both Mac and Windows. After copying the raw data from a SD card to a desktop computer, the Stitch software not only automatically stitches the fisheyes images and performs color adjustments, but it enables the operator to visually inspect and manually adjust these panoramas. The operator also has ability to load the images into a photo editing solution and make necessary changes, such as remove objects or information from scenes and blur sensitive data. Once finalized, the data is exported from the Stitch software to an iGuide zip file for upload to the iGuide portal.
The example Palo Alto Eichler project did not require any adjustments, so only 10 minutes was required to load into the Stitch software, inspect the results and export zip file. The Stitch pre-processing compacts the data by a factor of 3x, which helps speed up the upload process in iGuide post-processing below.
iGuide Post-Processing (Create iGuide)
The operator logs into the iGuide Portal, creates a new property, and configures the basics, including address, description, and external video links (if they exist). They can select an agent branding banner from a library or user an agent’s pre-defined banner if they already have an iGuide account.
The next step is to upload the compressed files from pre-processing. Since this 3D tour data was compacted to about 40 mb, this upload process takes about 3 minutes with a 2 Mbps upload speed. The iGuide is immediately live and viewable online after this upload. Once the schematic floor plan drafting is completed the next day by iGuide, the full iGuide Report is sent by the operator to the agent, which includes links to URLs and the raw data. This process for the Palo Alto Eichler project took 10 minutes.
After agents receive their iGuide, it is common to receive feedback and change requests. The iGuide system allows the operator to modify schematic floor plan labels, enable and disable panoramic images, and even modify panoramic and gallery images. Agents can also create iGuide Portal accounts to modify iGuide details in the same way as the operator.
iGuide Level of Effort (LOE) Summary
Chart 22 | iGuide Level of Effort (LOE) Summary | Source: Paul Collart

iGuide 3D Tour Experience
iGuide enables dynamic navigation within a 3D tour by enabling the visitor to select hotspots on the schematic floor plan or directional arrows within a panorama.

iGuide Arrows
As illustrated below, hovering the cursor over an arrow within the panorama, will highlight the associated hotspot on the schematic floor plan.
Also, the current hotspot in the floor plan, will illustrate the field of view within the panorama image.
These tools give the visitor a dynamic sense of context and space while walking through the property.

iGuide Floor Plan
A nice feature is the ability to minimize the reference floor plan so that the panoramas can maximize the screen area.
iGuide can also zoom into panoramic images by leveraging the roller on a mouse or selecting the + / - icons in the upper left corner of the 3D tour as shown below.

iGuide Zoom
Since the roller on the mouse is used for zooming into a panoramic image, it is not used for navigating between panoramic images like other solutions. Also, iGuide does not leverage keyboard arrow keys for navigation akin to video games.
And lastly, one of the unique features to iGuide compared to the other systems is the ability to take on-screen measurements, which could assist in planning, renovations, and general improvements.
iGuide Mobile Browser Experience
The Planitar experience on a phone or tablet is very similar to a desktop browser with a few minor differences.
The ideal viewing experience is in landscape mode with the reference floor plan minimized, which enlarges the panorama to full screen.
In the following screen grabs from a Galaxy S7 phone, the portrait mode is unable to minimize the reference floor plan.
Also, the mobile browser experience allows for dynamic tilt viewing (i.e. move phone up/down/left/right) for phones with a built-in gyroscope.

iGuide Tilt Icon
Simply select the following icon in the upper right hand corner in the panoramic image to enable or disable this mode.
iGuide viewed on Smartphone (Portrait)

iGuide viewed on Smartphone (Landscape)
iGuide Virtual Reality Experience
iGuide will be releasing VR features at the beginning of 2017. It will be browser-based (i.e. no external required for installation) and support Google cardboard.
iGuide Estimated Hardware Costs
Chart 23 | iGuide Estimated Hardware Costs | Source: Paul Collart
Editor's Note: Join in the discussion of this chart in the We Get Around Network Forum Post: Comparing Hardware Costs of 5 3D/VR Platforms

iGuide Tour Cost for Palo Alto Eichler
Chart 24 | iGuide Tour Cost for Palo Alto Eichler | Source: Paul Collart
Editor's Note: Join in the discussion of this chart in the We Get Around Network Forum Post: Comparing Hosting and Processing of 5 3D Camera Systems.

Please note that iGuide includes the generation of a schematic floor plan in the cost of model processing.
iGuide Variable 3D Tour Costs
iGuide does not charge minimum subscription fees for use of the system. The cost to process and host an iGuide 3D tour is based on the project size and described below. Each package includes drafting and one (1) year of hosting.
Chart 25 | iGuide Variable 3D Tour Costs | Source: Paul Collart

Currently, iGuide hosting is ongoing and a program for beyond 1st year hosting fee has not been finalized. Note that that iGuide data is completely open, so it can be download and hosted anywhere.
Below provides some example projects and associated costs.
Chart 26 | iGuide Example Projects and Associated Costs | Source: Paul Collart

iGuide Company Background
Chart 27 | iGuide Company Background | Source: Paul Collart

immoviewer
The immoviewer solution is marketed as a Do-It-Yourself (DIY) 3D tour solution for real estate professionals based on the Ricoh Theta S 360-degree camera.

As opposed to simply leveraging the Ricoh Theta S camera and built-in software, immoviewer creates a mobile application around the Ricoh APIs that streamlines and simplifies the process of creating a 3D tour.
The result is a fast and easy-to-use solution for creating 3D tours.
Additional features include:

Ricoh Theta S
- A web conferencing tool which allows agents to virtual walk potential buyers through a listing from anywhere at any time
- Integrate pre-created floor plans or request the creation of a floor plan for an additional fee, which costs between $4 to $40 per floor
- Supports multiple countries (and languages), including United States, United Kingdom, France, Italy, and Germany
- Ability to limit access to specific panoramas and require registration to “unlock” the full 3D tour. Please see the link below to the locked 3D tour, which currently locks all panoramas except for the home
- Detailed statistics available for registered visitors, including viewing information on rooms visited and for how long
The sample 3D tours can be found here: Unlocked | Locked
immoviewer Creating the 3D Tour
The folks at immoviewer were kind enough to send me a Ricoh Theta S camera to test their solution.
I decide to use a simple monopod to mount the Ricoh Theta S, which I have used in the past with my Samsung Gear 360 camera. Unfortunately, while starting my shoot of images in the front yard, the monopod toppled over after a gust of wind, resulting in a cracked Ricoh Theta and scratched lens.
I managed to put the unit back together and use for my testing, but please note some of the imagery in the 360 Tour contains some noticeable blurring from the scratched lens. Just a note to everyone to use as sturdy tripod while using this equipment.
immoviewer Data Capture (3D Tour)
Before starting the capture process, I had to create an account with immoviewer and install their Android application on my Galaxy S7 phone. Please note that immoviewer is also compatible with mobile phones leveraging Apple’s iOS.
Chart 28 | immoviewer Create Hotspots | Source: Paul Collart
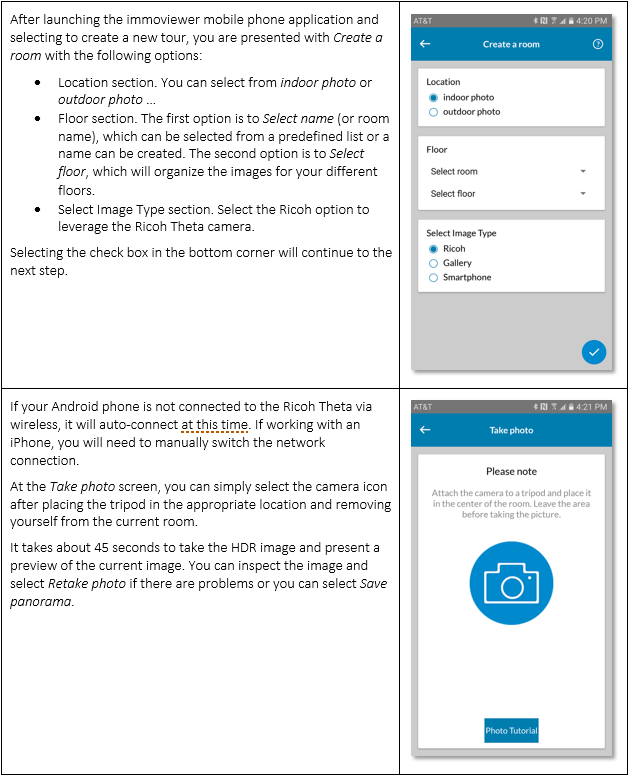

For the example Palo Alto Eichler project, 6 outdoor and 11 indoor scans were create for a total of 17. The total operator time to capture the 3D tour was about 24 minutes, which equates to about 1 minute 25 seconds to position the tripod and camera at a new location, configure scene, take panoramic image (40 seconds), and configure hotspots.
Once finished, you simply select Finish tour, change to a wireless network that has access to the Internet and initiate the upload to the immoviewer cloud. The sample Palo Alto Eichler project took about 60 MB of storage space, which will take about 5 minutes to upload to the immoviewer cloud with a 2 Mbps upload speed.
immoviewer Post-Processing
After uploading the data to the immoviewer cloud, the 3D tour is immediately available for viewing and editing. Since the naming of floors and rooms and configuration of hotspots are accomplished with the mobile application, the immoviewer cloud application is mainly used for making minor modifications to the 3D tour. An operator can configure or change the following items:

immoviewer screen grab
- Rename panoramas or change the order within the reference gallery
- Edit a listing agent’s details and apply to a specific tour
- Rename and reorder panoramas
- Add missed hotspots or modify existing hotspots
- Blur sensitive details capture in panoramas (i.e. faces, license plates, etc.)
- Modify the horizontal field of view of panoramas. Not the initial panorama (View from Sidewalk) was changed to not allow looking across the street
- In the Palo Alto Eichler sample tour, a pre-created floor plan was uploaded and hotspot locations were manually configured. immoviewer does provide a service to generate the floor plan for an additional fee
The operator or agent can extract images from the 3D tour to be used for external photo galleries. There are options to select the aspect ratio (standard 4:3, professional 3:2, and square 1:1), scale the area, and select to save the jpg image to file.
immoviewer Level of Effort (LOE) Summary
Chart 29 | immoviewer Level of Effort (LOE) Summary | Source: Paul Collart

immoviewer 3D Tour Experience
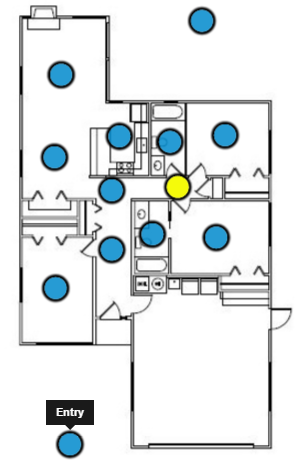
The immoviewer 3D tour interface is comprised of 360°x180° panoramas connected via hotspots, with an option reference floor plan that can be enlarged with an icon in the bottom right corner. Immoviewer enables dynamic navigation within a 3D tour via the following methods:
- Hotspots in the panoramas, which are displayed as the 360° icon below, can be selected to navigate to the next panorama. Hovering the cursor over a hotspot, will display the preview of the next panorama along with its name

immoviewer HotSpots
- Highlight Reel. Click on any thumbnail to navigate directly to a panorama location

immoviewer Highlights Reel
immoviewer Floor Plan
If floor plans are created for the tour, clicking on any blue dot in the reference floor plan to transport to that panorama.
Hovering over a blue dot will preview the name of the panorama, while the yellow dot represents the current panorama.
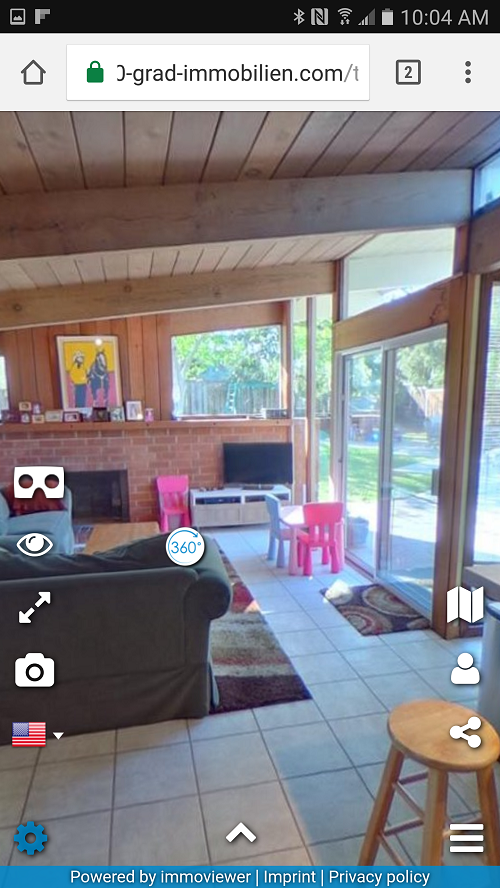
immoviewer Mobile Browser Experience -
The immoviewer experience on a phone or tablet is very similar to a desktop browser and includes the same on-screen options. Please see the following screen grabs from a Galaxy S7 phone.
Please note that in the portrait version below displays all available on-screen options, while the landscape version it maximized to the screen with the on-screen options minimized.
immoviewer Viewed on a Smartphone (Portrait)

immoviewer Viewed on a Smartphone (Landscape)
immoviewer Virtual Reality Experience
Every immoviewer 3D tour comes VR ready with support for Google Cardboard.

immoviewer VR Icon
You need to simple load the 3D tour into the browser of your mobile device, select the full-screen option, select the Settings icon, and then select the VR icon, which is shown below.
Since immoviewer leverages the browser, there is no requirement to install an application on the mobile device to experience VR.

immoviewer VR Side-by-Side View
immoviwer Estimated Hardware Costs
Chart 30 | immoviwer Estimated Hardware Costs | Source: Paul Collart
Editor's Note: Join in the discussion of this chart in the We Get Around Network Forum Post: Comparing Hardware Costs of 5 3D/VR Platforms

immoviewer 3D Tour Cost for Palo Alto Eichler
There is no cost to process a specific tour if on a current subscription plan described below.
immoviewer Variable 3D Tour Costs
immoviewer charges a monthly subscription fee for access to the system. All plans include unlimited access to the immoviewer Suite. There is no variable pricing based on the size of the project. Summary of plans are listed below:
Chart 31 | immoviewer Variable 3D Tour Costs | Source: Paul Collart
Editor's Note: Join in the discussion of this chart in the We Get Around Network Forum Post: Comparing Hosting and Processing of 5 3D Camera Systems.

For custom pricing and solutions available for 20+ active tour, please contact immoviewer directly.
immoviewer Company Background
Chart 32 | immoviewer Company Background | Source: Paul Collart

More 3D Tour Solutions
The last couple of years has seen the introduction of many low-cost 360° cameras, which was followed by a slew of DIY web-based platforms to create 3D tours. These solutions have common workflows, such as the following:
- Upload panoramas to the cloud
- Order and name the panoramas
- Create hotspots in images to link to other panoramas or other types of links. Note that this is automated for the majority of the previously detailed solutions in this review
- If the solution supports a reference floor plan, upload a floor plan image and place hotspots to panoramas. Note that this is automated for the majority of the previously detailed solutions in this review
- Publish the tour
It is important to point out that the image quality is dependent upon the 360° camera hardware and associated software. Over the next few years this quality is only going to get better and cheaper. I have researched over a dozen of these types of solutions, but have only created sample 3D tours with the following. Detailed review of these solutions is possible in the future, which would require cooperation of the solution provider and my continued motivation.
CUPIX
CUPIX, based in South Korea and founded in late 2015, is a new entrant into the 3D tour space. Their team was born out of 3D Systems, one of the largest 3D printer makers in the world, and has extensive experience in 3D scanning and computer vision. CUPIX will be marketing their cloud-based solution for real estate 3D tours and 3D documentation of existing structures.

Their core technology leverages photogrammetry to transform randomly positioned panoramas into a point cloud or mesh model. The result is an effective alternative to 3D scanning. An additional feature in their solution is to automatically position these panorama locations within this indoor space for 3D tours.
For the CUPIX sample 3D tour of the Palo Alto Eichler, I created the images with a Ricoh Theta S camera they lent me for the day, and then CUPIX performed the upload of the images into their cloud system for processing. Their solution is currently in Private Beta, with plans for a Public Beta in the first quarter of 2017. Please see the sample 3D tour of Palo Alto Eichler here.
You should keep a look out for their solution in the coming year 2017.
Holobuilder
Holobuilder, based in San Francisco and founded in late 2014, creates a 3D tour solution for real estate and construction. The example 3D tour was created by manually uploading panoramas, creating hotspots in images, and locating hotspots on a reference floor plan.

I have mixed feeling regarding their online builder application, due to multiple browser crashes, which resulted in lost work and frustration. I found myself saving often and restarting the browser when the interface became sluggish. Please see the 3D tour of Palo Alto Eichler here.
Holobuilder provides a JobWalk application for Android and iOS, which enables users to dynamically locate hotpots on pre-created floor plans while taking the panoramic imagery. Their pricing structure can be found here.
iStaging
iStaging, based in Taipei and founded in 2014, created LiveTour, a platform to immerse potential buyers or tenants within a 3D tour.
To get started, you are required to purchase the LiveTour Bundle for $99, which includes access to the their online LiveTour Creator, the mobile application VM Cam App, iStaging VR Glasses, 12-month Access Pass, and unlimited LiveTour (3D tour) creation (iStaging 3D Tour example)
There is also a $60 option if the VR Glasses are not needed.
The following 3D tours were created by manually uploading panoramas to the LiveTour portal, manually orderings and naming the images, manually placing hotspots, and finally manually placing hotspots on a pre-created reference floor plan. The interface could use further development to make this process faster and more intuitive for end-users.
- Palo Alto Eichler
- Residence Under Construction (May 2016)
- Residence Under Construction (Sep 2016)
I did a quick review of their VM Cam App mobile phone application, but it appeared to only automate the upload of 360-degree images to their cloud and did not include features for users to dynamically administer the 3D tour with names and hotspots during the process of capturing imagery. I was unable to get clarification from the iStaging team.
Roundme
Roundme, based in Silicon Valley and founded in 2012, was the first 3D tour solution I used to organize my panoramic images for architectural projects. I have tried many other systems, but always come back to Roundme for quick and and low-cost panorama sharing.
It has been the easiest to use. Their solution is marketed as a generic solution to share 360-degree images, so they do not have features typically required for real estate, including support for floors and a reference floor plan.
Please see my sample 3D tours below.
- Palo Alto Eichler | images taken with a Samsung Gear 360 camera
- Residence Under Construction (May 2016) | images taken with a Panono camera
- Residence Under Construction (Sep 2016) | | images taken with a Samsung Gear 360 camera
Roundme offer the following subscription plans:
- Basic, free forever. Upload 15 panoramas a week, unlimited storage.
- Pro, $99 / year. Unlimited panoramas, unlisted spaces.
There are additional upgrades for white-labeling, privacy, and security. The ability to add custom maps is coming soon.
Vieweet
I learned about Vieweet, a company based out of London and founded in 2015, from the We Get Around Network Forum and decided to give their solution a try. Their Vieweet 360-degree solution provides real estate specific features, including the ability to add property information and upload a reference floor plan.

The on-line administrative interface to place panoramas in order, create hotspots within panoramas, and define hotspots on the floor plan could use further development to make it easier and faster to administer. They also offer a mobile app to dynamically create hotspots during image capture, but I did not have the opportunity to try this out.
Please see my sample 3D tour of Palo Alto Eichler here.
Vieweet can support the upload of any 360-degree imagery to their online solution, but they also offer some hardware “Kits”, which include a 12-month subscription to get people going, which you can find here. Please note that there is not a fee per 3D tour like many of the other solutions in this review, but Vieweet does require a monthly subscription plan, which is broken down below.
- 20 Concurrent Virtual Tours = $20 / month or $170 / year
- 200 Concurrent Virtual Tours = $150 / month
- 600 Concurrent Virtual Tours = $400 / month
Vieweet also offers some other solutions:
- Vieweet Scan. leverages augmented reality to bring 3D models to life by using printed marketing material as a marker.
- Vieweet 3D. Services to create interactive 3D models from floor plans and images of the property, which takes 6-8 days to complete.
- Smart Viewing. Solution to present private, guided 3D tours with potential buyers or tenants.
Even More 3D/VR/360-Degree Solutions
You could also try checking out the following 3D tour platforms, which are listed in alphabetical order.
# # # # #

Editor's Note: San Francisco-based Paul Collart has been eating and breathing software development and workflow integration for the past 25 years. With a B.S. in Mechanical Engineering from Santa Clara University he followed his interests in CADD and Architecture into the technology sector of the AEC industry.
He founded Technesis in the late 90’s, taking it from an AEC technology consultancy to an Enterprise Print Management software company.
After selling the company in late 2015, he has been immersing himself in the latest technologies for the AEC industry: researching and testing Augmented Reality (AR), Virtual Reality (VR) 3D reconstruction technologies and their implementation in workflow process.